Proxmox part 6: Virtualized nftables home LAN router
Let’s make a network router/firewall/DHCP/DNS server for the home LAN, with nftables, dnsmasq, and dnscrypt-proxy, all inside of a Proxmox KVM virtual machine, and a physical four port network interface using PCI passthrough. We’ll use nftables counters on a per-route basis to collect traffic statistics, and export these to a separate prometheus/grafana VM in order to monitor bandwidth usage.
Notice
This blog is written in a Literate Programming style, if you are new here, please read the section called Running Commands from a previous blog series I wrote (you only need to read that one section and then come back here.)
This is the sixth post in the proxmox blog series, which at this point contains some non-sequitors. For the purpose of creating a router, you can probably skip posts 1->3. If you have already installed Proxmox, then the only required reading is the immediately previous post: KVM Templates, so you should start there.
This blog is subject to constant revision, experimentation, and hopefully improvements. If you need a stable set of instructions for your own production router, please refer to the git repository containing this blog and take note of which version you are following, or fork it to make it your own.
Hardware
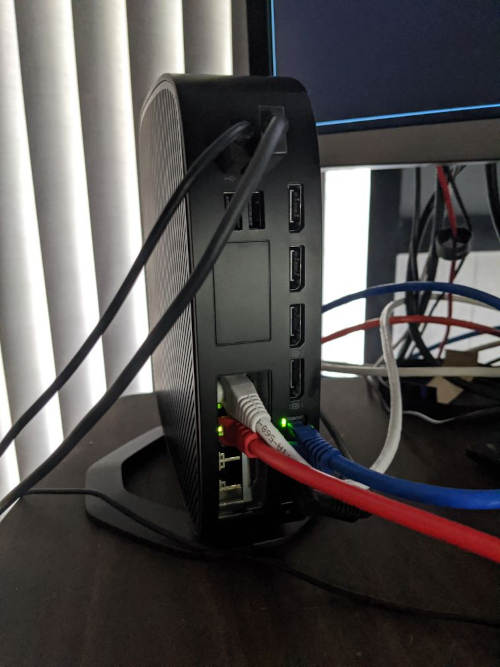
The Proxmox server hardware used for testing is the HP thin client t740. This unit has a single PCIe slot, and it is populated with an Intel i350-T4 (Dell OEM) network adapater with four physical ethernet jacks. There is also one on-motherboard ethernet jack (Realtek) for a total of five NICs.
Proxmox is installed with the on-board Realtek NIC as the only
interface bonded to vmbr0 (the default public network bridge in
Proxmox) and this port is used only for administrative purposes. The
four ports on the i350-T4 are passed directly to a KVM virutal machine
via IOMMU (PCI passthrough). This means that the VM is totally in
control of these four physical NICs, and Proxmox is hands off.
The VM that uses the i350 ports will become the new router, with the
ports WAN, LAN, OPT1, OPT2, top to bottom as pictured above.
The white cable is WAN (internet), the red cable is LAN (local
area), and the blue cable is VM0, the on-board admin port which
is bonded to vbmr0.
Technically, the i350-T4 network interface should be capable of SRIOV (PCI multiplexing), which would allow the four ports to be split into several virtual interfaces (called “functions”) mapped to more than four VMs at the same time. However, I could not get this to work, as it appears that the Dell variety of this NIC disables SRIOV (doh! double check it when you buy it if you want this feature!). However, for this project, SRIOV is unnecessary and overkill, as the entire card will only need to be passed into this one VM, and this is fully supported.
In addition to the physical network ports, a second virtual bridge
(vmbr1) is used to test routing to other virtual machines in the
VM_ID 100->199 block, and this is assigned a virtual interface inside
the router named VM1. If you don’t have a machine with extra NICs
(or if it does not support IOMMU), you can still play along using this
virtual interface, but you will only be able to use this router for
VMs and containers inside Proxmox. (Maybe you could technically make a
router using VLANs with only one NIC, or you could bond additional
interfaces to a bridge on the Proxmox host without PCI passthrough,
and use additional virtual interfaces in router VM bonded to the same
bridge, but these alternative topics are outside the scope of this
post.)
Create the vmbr1 bridge
By default, Proxmox comes installed with only one bridge defined:
vmbr0, since this bridge is reserved for our administration port, we
need a separate bridge just for the VM_ID 100->199 block of machines
named vmbr1:
pvesh create /nodes/${HOSTNAME}/network \
  --iface vmbr1 \
  --type bridge \
  --cidr 192.168.1.2/24 \
  --autostart 1 && \
pvesh set /nodes/${HOSTNAME}/network
The proxmox host needs its own IP address on this network, so we will
choose the IP address 192.168.1.2, reserving the honor of
192.168.1.1 for the router VM itself.
Create the router VM
This post begins with the assumption that you have installed Proxmox
and are starting fresh with no VMs defined as of yet. The first VM we
will create will be the virtual router (VM_ID=100).
Arch Linux seems like a good choice for a router because it has the
latest kernel, and therefore the latest nftables version. Use the Arch
Linux template created in part 5
(TEMPLATE_ID=9000).
## export the variables needed by proxmox_kvm.sh:
export VM_ID=100
export TEMPLATE_ID=9000
export VM_HOSTNAME=router
VM1_BRIDGE=vmbr1
VM1_IP=192.168.1.1
./proxmox_kvm.sh clone
Add a virtual network interface to VM bridge vmbr1
Add a second network interface to act as the gateway for the VM_ID 100->199 block on the vmbr1 network bridge:
qm set ${VM_ID} \
   --net1 "virtio,bridge=${VM1_BRIDGE}" \
   --ipconfig1 ip=${VM1_IP}/24
Add the four physical NICs to the VM
On the Proxmox host, the i350-T4 shows up as a single PCI device
divided into four separate PCI device functions in the output of
lspci:
## example lspci excerpt
01:00.0 Ethernet controller: Intel Corporation I350 Gigabit Network Connection (rev 01)
01:00.1 Ethernet controller: Intel Corporation I350 Gigabit Network Connection (rev 01)
01:00.2 Ethernet controller: Intel Corporation I350 Gigabit Network Connection (rev 01)
01:00.3 Ethernet controller: Intel Corporation I350 Gigabit Network Connection (rev 01)
The left most column shows the PCI address of the device (01:00) and
the four device “functions” assigned to the four ethernet jacks: .0,
.1, .2, .3. If you look at ip link you will see these four
devices as enp1s0f0, enp1s0f1, enp1s0f2, and enp1s0f3.
(Note: If you have a card that has enabled SRIOV, lspci may list
more “functions” than the number of physical ports. This allows you to
use the same physical ethernet jack with multiple VMs at the same
time. This is not the case for the the test hardware, as it does not
have SRIOV, so these functions map exactly 1:1 to the physical
ethernet jacks on the card being tested, and they are all being passed
into to the router VM for exclusive use.)
Assign all of these device functions to the VM with one command
specifying only the root PCI address (01:00; without the .X):
qm set ${VM_ID} -machine q35 -hostpci0 01:00,pcie=on
Once you turn on the VM, you will find that ip link no longer shows
these devices on the Proxmox host, because they have been transferred
into the VM’s control.
Make an initial snapshot
You’re about to start the router VM for the first time, but before you do, make a snapshot. This way you will be able to rollback to a completely fresh state later if you need to, without needing to reclone and reconfigure the VM:
qm snapshot ${VM_ID} init
Start the VM
qm start ${VM_ID}
cloud-init will run the first time the VM boots. This will install the QEMU guest agent, which may take a few minutes.
Wait a bit for the boot to finish, then find out what the vm0 (admin) IP address is:
./proxmox_kvm.sh get_ip
(If you see QEMU guest agent is not running just wait a few more
minutes and try again. You can also find the IP address on the VM
summary page in the GUI once the guest agent is installed.)
Test that SSH works (replace x.x.x.x with the discovered IP
address):
ssh root@x.x.x.x
After the first boot, cloud-init will finish package upgrades and other tasks in the background. You should wait for these tasks to finish before using the VM. Check the completion of these tasks by running:
# Run this inside the VM shell to monitor cloud-init tasks:
cloud-init status -w
You can also find the full cloud-init log in
/var/log/cloud-init-output.log (inside the VM).
Install etckeeper to track configuration changes
etckeeper is a tool to
track all of the changes you make to the files in /etc/ inside of a
git repository that you can optionally push to a remote server for
backup.
GIT_EMAIL=root@${HOSTNAME}
GIT_USER=root
GIT_BRANCH=master
# Run this inside the router VM:
(set -ex
pacman -S --noconfirm etckeeper
systemctl enable --now etckeeper.timer
git config --global init.defaultBranch "${GIT_BRANCH}"
git config --global user.email "${GIT_EMAIL}"
git config --global user.name "${GIT_USER}"
etckeeper init
etckeeper commit -m init
)
The above setup will only keep a local git repository. If you wish to automatically push to a remote git server, see etckepeer: Automatic push to remote repo
Rename network interfaces
In the newly created VM you will find six ethernet devices via ip link (eth0->eth5). Let’s rename these interfaces to make it
easier to remember what they will be used for:
vm0(originallyeth0) - This is the virtual interface connected to thevmbr0bridge (the public Proxmox VM bridge) - this interface is primarily for administration purposes only. This interface will be configured by an external DHCP server that you provide.vm1(originallyeth1) - This is the virtual interface connected to thevmbr1bridge (the private VM bridge serving the VM_ID 100->199 block.) By convention, thevmbr1bridge will use the192.168.1.1/24network, and this VM will have the IP address of192.168.1.1.wan(originallyeth2) - The inner most physical port on the i350-T4 - this is the public wide-area network (ie. the internet) interface of the router. This interface will be configured by external DHCP.lan(originallyeth3) - The second inner most physical port on the i350-T4 - this is the private local-area network interface of the router (ie. the home LAN). This will have a static IP address of192.168.100.1and will run a DHCP server for the192.168.100.1/24network, serving the home LAN.opt1originally (eth4) - The second outer most physical port on the i350-T4 - this is an additional private network port (optional) with a static IP address of192.168.101.1.opt2originally (eth5) - The outer most physical port on the i350-T4 - this is an additional private network port (optional) with a static IP address of192.168.102.1.
Find the MAC addresses for each of the cards. Run all of the following from inside the router VM. Gather the four MAC addresses into temporary variables:
# Run this inside the router VM:
VM0_MAC=$(ip link show eth0 | grep "link/ether" | awk '{print $2}')
VM1_MAC=$(ip link show eth1 | grep "link/ether" | awk '{print $2}')
WAN_MAC=$(ip link show eth2 | grep "link/ether" | awk '{print $2}')
LAN_MAC=$(ip link show eth3 | grep "link/ether" | awk '{print $2}')
OPT1_MAC=$(ip link show eth4 | grep "link/ether" | awk '{print $2}')
OPT2_MAC=$(ip link show eth5 | grep "link/ether" | awk '{print $2}')
echo
echo "VM0  (virtual)        : ${VM0_MAC}"
echo "VM1  (virtual)        : ${VM1_MAC}"
echo "WAN  (physical)       : ${WAN_MAC}"
echo "LAN  (physical)       : ${LAN_MAC}"
echo "OPT1 (physical)       : ${OPT1_MAC}"
echo "OPT2 (physical)       : ${OPT2_MAC}"
For each interface, double check that the correct MAC addresses are printed.
The initial network configuration was bootstrapped by cloud-init.
Now we will replace this configuration with
systemd-networkd
to manager all of the network devices (and removing netplan to not
conflict):
## Run this inside the router VM:
(set -ex
# Rename all devices:
(for i in vm0,${VM0_MAC} vm1,${VM1_MAC} wan,${WAN_MAC} lan,${LAN_MAC} opt1,${OPT1_MAC} opt2,${OPT2_MAC};
    do IFS=","; set -- $i; interface=$1; mac=$2;
    cat <<EOF > /etc/systemd/network/10-${interface}.link
[Match]
MACAddress=${mac}
[Link]
Description=${interface^^} ethernet link
Name=${interface}
EOF
    done)

## Configure each interface for DHCP or static IP addresses:

cat <<EOF > /etc/systemd/network/20-wan.network
[Match]
Name=wan
[Network]
DHCP=yes
EOF

cat <<EOF > /etc/systemd/network/20-lan.network
[Match]
Name=lan
[Network]
Address=192.168.100.1/24
EOF

cat <<EOF > /etc/systemd/network/20-vm0.network
[Match]
Name=vm0
[Network]
DHCP=yes
[DHCP]
# Throw away any gateway this dhcp server gives us.
# Only the wan interface should have a gateway.
UseRoutes=false
EOF

cat <<EOF > /etc/systemd/network/20-vm1.network
[Match]
Name=vm1
[Network]
Address=192.168.1.1/24
EOF

## Enable systemd-networkd:
systemctl enable --now systemd-networkd.service

## Ignore as yet unconfigured devices on boot (OPT1 and OPT2):
sed -i \
  's|^ExecStart=.*|ExecStart=/usr/lib/systemd/systemd-networkd-wait-online --ignore=opt1 --ignore=opt2|' \
  /etc/systemd/system/network-online.target.wants/systemd-networkd-wait-online.service

## Disable the original cloud-init networking (netplan)
rm -rf /etc/netplan
cat <<EOF > /etc/cloud/cloud.cfg.d/disable-netplan.cfg
network:
  config: disabled
EOF
)
echo done
Plug in the ethernet cables for WAN and LAN. OPT1 and OPT2
will remain vacant for now.
Reboot the VM for the new device names to take effect:
reboot
SSH back in again once it reboots, and double check the new network devices:
ip addrshould show each device instate UPand have an IPv4 address (inet x.x.x.x). (all except for opt1 and opt2 which are not used yet.)ip routeshould show ONLY ONE single default gateway on theWANdevice (default via x.x.x.x dev wan ...) in addition to severallinklevel routes for each configured device.
Install dnsmasq
You will need a DHCP server and DNS server for the lan and vm1 interfaces.
Install dnsmasq, and create two separate config files for two DHCP servers listening on exclusive interfaces:
# Run this inside the router VM:
( set -e
if ! command -v dnsmasq >/dev/null; then pacman -S --noconfirm dnsmasq; fi

cat <<EOF > /etc/dnsmasq-vm1.conf
interface=vm1
except-interface=lo
domain=vm1
bind-interfaces
listen-address=192.168.1.1
server=::1
server=127.0.0.1
dhcp-range=192.168.1.10,192.168.1.250,255.255.255.0,1h
dhcp-option=3,192.168.1.1
dhcp-option=6,192.168.1.1
EOF

cat <<EOF > /etc/dnsmasq-lan.conf
interface=lan
except-interface=lo
domain=lan
bind-interfaces
listen-address=192.168.100.1
server=::1
server=127.0.0.1
dhcp-range=192.168.100.10,192.168.100.250,255.255.255.0,1h
dhcp-option=3,192.168.100.1
dhcp-option=6,192.168.100.1
EOF

cat <<'EOF' > /etc/systemd/system/dnsmasq@.service
[Unit]
Description=dnsmasq for %i
Documentation=man:dnsmasq(8)
After=network.target
Before=network-online.target nss-lookup.target
Wants=nss-lookup.target

[Service]
ExecStartPre=/usr/bin/dnsmasq -C /etc/dnsmasq-%i.conf --test
ExecStart=/usr/bin/dnsmasq -C /etc/dnsmasq-%i.conf -d --user=dnsmasq --pid-file
ExecReload=/bin/kill -HUP $MAINPID
Restart=on-failure
RestartSec=5
PrivateDevices=true
ProtectSystem=full

[Install]
WantedBy=multi-user.target
EOF

systemctl daemon-reload
systemctl enable --now dnsmasq@vm1.service
systemctl enable --now dnsmasq@lan.service
)
dnsmasq will serve as a DHCP server and a caching DNS resolver that
forwards queries to dnscrypt-proxy, which will be setup in the next
section.
Install dnscrypt-proxy DNS server
# Run this inside the router VM:
(set -ex
if ! command -v dnscrypt-proxy >/dev/null; then pacman -S --noconfirm dnscrypt-proxy; fi
sed -i \
  -e "s/^listen_addresses =.*/listen_addresses = ['127.0.0.1:53','[::1]:53']/" \
  -e "s/^# server_names =.*/server_names = ['cloudflare']/" \
  /etc/dnscrypt-proxy/dnscrypt-proxy.toml

systemctl enable --now dnscrypt-proxy

chattr -i /etc/resolv.conf || true
rm -f /etc/resolv.conf
cat <<EOF > /etc/resolv.conf
nameserver ::1
nameserver 127.0.0.1
options edns0
EOF
chattr +i /etc/resolv.conf
)
dnscrypt-proxy only listens on localhost port 53. dnsmasq is
running a small caching DNS server that forwards to dnscrypt-proxy.
Install nftables
Install and enable nftables:
# Run this inside the router VM:
pacman -S --noconfirm nftables
systemctl enable --now nftables
nftables comes installed with a pre-configured firewall ruleset in
/etc/nftables.conf. You can look at the current configuration with:
# Run this inside the router VM:
nft list ruleset
The default ruleset is a basic configuration that drops all incoming packets except for SSH and ICMP for ping. This configuration is not yet suitable for a router, but provides a reasonble place to start.
Create nftables rules
Overwrite the /etc/nftables.conf and provide the new nftables
configuration:
## Run inside the router VM:

cat <<EOF > /etc/sysctl.d/ip_masquerade.conf
net.ipv4.ip_forward = 1
EOF

cat <<'EOF' > /etc/nftables.conf
#!/usr/bin/nft -f

define VM1_CIDR = 192.168.1.1/24
define LAN_CIDR = 192.168.100.1/24
define OPT1_CIDR = 192.168.101.1/24
define OPT2_CIDR = 192.168.102.1/24

define WAN_INTERFACE = { wan }
define PRIVATE_INTERFACES = { vm1, lan, opt1, opt2 }

define VM0_ACCEPTED_TCP = { 22 }
define VM1_ACCEPTED_TCP = { 53, 9100 }
define VM1_ACCEPTED_UDP = { 53, 67 }
define LAN_ACCEPTED_TCP = { 53 }
define LAN_ACCEPTED_UDP = { 53, 67 }

define PUBLIC_ACCEPTED_ICMP = {
    destination-unreachable,
    router-advertisement,
    time-exceeded,
    parameter-problem }
define PUBLIC_ACCEPTED_ICMPV6 = {
    destination-unreachable,
    packet-too-big,
    time-exceeded,
    parameter-problem,
    nd-router-advert,
    nd-neighbor-solicit,
    nd-neighbor-advert }

## Remove all existing rules:
flush ruleset

## filter IPv4 and IPv6:
table inet filter {
  set public_accepted_icmp { type icmp_type; elements = $PUBLIC_ACCEPTED_ICMP }
  set public_accepted_icmpv6 { type icmpv6_type; elements = $PUBLIC_ACCEPTED_ICMPV6 }

  set private_interfaces { type iface_index; elements = $PRIVATE_INTERFACES }
  set vm0_accepted_tcp { type inet_service; flags interval; elements = $VM0_ACCEPTED_TCP }
  set vm1_accepted_tcp { type inet_service; flags interval; elements = $VM1_ACCEPTED_TCP }
  set vm1_accepted_udp { type inet_service; flags interval; elements = $VM1_ACCEPTED_UDP }
  set lan_accepted_tcp { type inet_service; flags interval; elements = $LAN_ACCEPTED_TCP }
  set lan_accepted_udp { type inet_service; flags interval; elements = $LAN_ACCEPTED_UDP }

  ## To ban a host for one day: nft add element ip filter blackhole { 10.0.0.1 }
  set blackhole { type ipv4_addr; flags timeout; timeout 1d; }

  counter wan-egress { }
  counter wan-ingress { }

  chain input {
    type filter hook input priority filter
    policy drop

    ct state invalid drop comment "early drop of invalid connections"
    iif lo accept comment "allow from loopback"
    iif $WAN_INTERFACE counter name wan-ingress;
    ip saddr @blackhole drop comment "drop banned hosts"
    ct state {established, related} accept comment "allow tracked connections"

    ### Allow only a subset of ICMP messages:
    iif @private_interfaces ip protocol icmp accept comment "Allow private unrestricted ICMP"
    iif @private_interfaces ip6 nexthdr icmpv6 accept comment "Allow private unrestricted ICMPv6"
    iif $WAN_INTERFACE ip protocol icmp icmp type @public_accepted_icmp limit rate 100/second accept comment "Allow some ICMP"
    iif $WAN_INTERFACE ip6 nexthdr icmpv6 icmpv6 type @public_accepted_icmpv6 limit rate 100/second accept comment "Allow some ICMPv6"

    tcp dport @vm0_accepted_tcp iifname vm0 ct state new log prefix "Admin connection on VM0:" accept
    tcp dport @vm1_accepted_tcp iifname vm1 ct state new accept
    udp dport @vm1_accepted_udp iifname vm1 ct state new accept
    tcp dport @lan_accepted_tcp iifname lan ct state new accept
    udp dport @lan_accepted_udp iifname lan ct state new accept

    iif $WAN_INTERFACE drop comment "drop all other packets from WAN"
    pkttype host limit rate 5/second counter reject with icmpx type admin-prohibited comment "Reject all other packets with rate limit"
    counter
  }
  chain forward {
    type filter hook forward priority filter; policy drop;
    ct state invalid drop comment "early drop of invalid connections"
    ct state {established, related} accept comment "allow tracked connections"
    iif @private_interfaces oif $WAN_INTERFACE accept comment "allow private network WAN egress"
  }
  chain output {
    type filter hook output priority filter; policy accept;
    oif $WAN_INTERFACE counter name wan-egress
  }
}

table ip nat {
  set private_interfaces { type iface_index; elements = $PRIVATE_INTERFACES }
  chain prerouting {
    type filter hook output priority filter; policy accept;
  }
  chain postrouting {
    type nat hook postrouting priority srcnat;
    iif @private_interfaces oif $WAN_INTERFACE masquerade
  }
}
EOF

sysctl --load /etc/sysctl.d/ip_masquerade.conf >/dev/null
systemctl restart nftables
Verify the new ruleset:
# Run this inside the router VM:
nft list ruleset
To check the nftables.conf syntax run:
# Run this inside the router VM:
## This won't reload the firewall, but will simply check the syntax:
nft -f /etc/nftables.conf -c
(If the syntax is 100% correct, this won’t print anything.)
Create a test VM on vmbr1
In order to test the router, DHCP, and DNS servers, you can create a
test VM that will connect to the vmbr1 bridge, automatically
retrieve an IP address from the DHCP server, and connect to the
internet through the router.
For temporary testing purposes, create a debian host (using
TEMPLATE_ID=9001 created previously in KVM
Templates):
## export the variables needed by proxmox_kvm.sh:
export VM_ID=199
export TEMPLATE_ID=9001
export VM_HOSTNAME=test1
export VM_PASSWORD=root
./proxmox_kvm.sh clone
Configure the networking for vmbr1:
qm set ${VM_ID} \
   --net0 "virtio,bridge=vmbr1" \
   --ipconfig1 ip=dhcp \
   --nameserver 192.168.1.1 \
   --searchdomain vm1
Start the test VM:
qm start ${VM_ID}
Connect to the console:
qm terminal ${VM_ID}
(Ctrl-o to quit.)
Wait for the VM to boot and login as root using the temporary
password (also root). (If you don’t see the login prompt, press
Enter a few times.)
Check that everything is working from inside the test VM:
- Check
ip addr,eth0should have receieved an active IP address in the range192.168.1.x. (I have observed thateth0erroneously receives TWO ip addresses on the first boot, but only one on subsequent reboots.) - Check
ip routeshould show only one default gateway (default via 192.168.1.1 dev eth0). - Check that
/etc/resolv.confshows only one nameserver (192.168.1.1) with a search domain ofvm1. (If you see more than one nameserver, you may have forgot to set the cloud-init--nameserverand--searchdomainin the VM settings as shown above.) - Check that you can
ping 192.168.1.1to test connectivity to the router. - Check that you can
ping 1.1.1.1to test connectivity to the internet. - Check that you can
ping one.one.one.oneto test DNS. - Check that
ssh 192.168.1.1showsNo route to host(SSH to the router should be blocked fromvmbr1.)
Install Prometheus
Let’s create a
Prometheus powered
dashboard to monitor network bandwidth per interface/client. Create a
new Docker VM (use the Docker TEMPLATE_ID=9998 introduced in KVM
Templates) and configure it for the
vmbr1 network:
## export the variables needed by proxmox_kvm.sh:
export TEMPLATE_ID=9998
export VM_ID=101
export VM_HOSTNAME=prometheus
unset VM_PASSWORD
# Run this on the proxmox host:
./proxmox_kvm.sh clone && \
qm set ${VM_ID} \
   --net0 "virtio,bridge=vmbr1" \
   --ipconfig1 ip=dhcp \
   --nameserver 192.168.1.1 \
   --searchdomain vm1 && \
qm start ${VM_ID}
Wait for the Docker VM to boot, and get the IP address:
./proxmox_kvm.sh get_ip
SSH to the Prometheus VM using the discovered IP address:
ssh root@x.x.x.x
Docker is preinstalled and running, you can verify it is working:
# Run this inside the prometheus VM:
docker run hello-world
This will print Hello from Docker! and some additional information.
Install node-exporter on each VM
You can install node-exporter on all the VMs and other hosts you wish to monitor with prometheus. Let’s start by installing node-exporter inside the prometheus VM itself:
# Run inside the prometheus VM:
apt-get install -y prometheus-node-exporter
(On debian, the prometheus-node-exporter service is started
automatically.)
Also install this in the router VM:
# Run inside the router VM:
pacman -S --noconfirm prometheus-node-exporter
systemctl enable --now prometheus-node-exporter
Create prometheus config file
# Run this inside the prometheus VM:
mkdir -p /etc/prometheus
cat <<EOF > /etc/prometheus/prometheus.yml
global:
  scrape_interval: 15s
  external_labels:
    monitor: 'codelab-monitor'
rule_files:
  - /etc/prometheus/node-exporter.rules.yml
scrape_configs:
  - job_name: 'prometheus'
    scrape_interval: 5s
    static_configs:
      - targets: ['localhost:9090']
        labels:
          group: 'prometheus'
  - job_name: 'node'
    static_configs:
      - targets: ['prometheus:9100']
        labels:
          group: 'prometheus'
      - targets: ['192.168.1.1:9100']
        labels:
          group: 'router'
EOF
Create prometheus node-exporter recording rules
Copied from the grafana node-exporeter documentation:
# Run this inside the prometheus VM:
wget https://grafana.com/oss/prometheus/exporters/node-exporter/assets/node_rules.yaml \
 -O /etc/prometheus/node-exporter.rules.yml
Install prometheus container
# Run this inside the prometheus VM:
docker run --name prometheus --restart=always -d \
  -v /etc/prometheus:/etc/prometheus \
  -p 9090:9090 \
  prom/prometheus
Install Grafana
Create datasources configuration
# Run this inside the prometheus VM:
mkdir -p /etc/grafana/datasources
cat <<EOF > /etc/grafana/datasources/datasources.yml
apiVersion: 1
datasources:
 - name: Prometheus
   type: prometheus
   uid: prometheus
   url: http://prometheus:9090
EOF
Create dashboards configuration
mkdir -p /etc/grafana/dashboards /var/lib/grafana/dashboards
cat <<EOF > /etc/grafana/dashboards/dashboards.yml
apiVersion: 1
providers:
  - name: 'local dashboards'
    disableDeletion: true
    updateIntervalSeconds: 60
    allowUiUpdates: false
    options:
      path: /var/lib/grafana/dashboards
      foldersFromFilesStructure: true
EOF

# https://grafana.com/grafana/dashboards/13978
wget https://grafana.com/api/dashboards/13978/revisions/2/download \
  -O /var/lib/grafana/dashboards/node-exporter.dashboard.json
Install Grafana
docker run --name=grafana --restart=always -d \
  -e "GF_INSTALL_PLUGINS=" \
  -v /etc/grafana/datasources:/etc/grafana/provisioning/datasources \
  -v /etc/grafana/dashboards:/etc/grafana/provisioning/dashboards \
  -v /var/lib/grafana/dashboards:/var/lib/grafana/dashboards \
  -p 3000:3000 \
  grafana/grafana-oss
TODO: setup nftables metrics exporter
You can discuss this blog on Matrix (Element): #blog-rymcg-tech:enigmacurry.com
This blog is copyright EnigmaCurry and dual-licensed CC-BY-SA and MIT. The source is on github: enigmacurry/blog.rymcg.tech and PRs are welcome. ❤️